Vintage Lady Hanger Tutorial
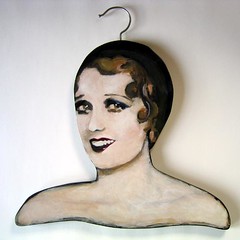
This silent movie star hanger was my favorite holiday project that I made last year. It was inspired by a vintage hanger that my friend, Sundee, used to have when we were housemates. Her hanger lady was dark, moody and had a beautiful sixty-year patina. We hung her on the wall and she looked lovely. Somewhere along the way, after several cross-Atlantic movings, the original hanger lady got lost. I'll try to find a photo of her to post later.
One of the nice things about making a functional art piece is that if the gift receiver doesn't feel like putting it on their wall they can put it in their closet without feeling guilty. It doesn't take up a lot of room and it serves a very practical purpose. Also, it's fairly inexpensive if you already have the jigsaw, drill and paint.
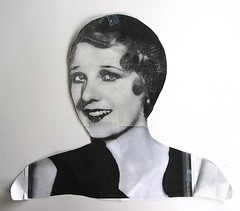
First I went online to find a lovely lady. My requisites for the photo were: front facing, preferably with neck and shoulders exposed; hair that looked manageable from a sawing perspective; and a certain makeup style that included lots of dark eye shadow. I would have preferred to have an anonymous person, not a movie star - but because of time limitations, I figured an actress would be easier to find. I settled with a lesser known star, someone that I had never heard of: Anita Page. There are great photos to choose from here and here.
After I chose my photo I printed out a hanger-sized black and white copy to use as a template. It took several pieces of 8 1/2 x 11 inch paper taped together to get the whole image at the right size. Sizing was trial by error - I just kept trying until I got it right. I wanted it to be life size, so that it would look right with clothes hanging from it. I cut the template into a shape that I thought looked nice and would be functional.
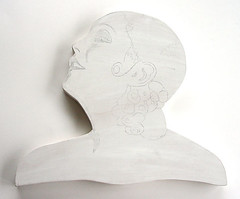
I traced the outline of the template onto a piece of high-quality plywood (smooth, no knots). With a jigsaw, and some ear protection on, I cut the basic shape for the hanger trying not to leave too many bumps that would have to be sanded later. My three-year-old son and I sanded the edges together by hand. I figured perfect sanding (i.e. with the grain) wasn't too important because I was going to be priming the wood white and then painting over it.
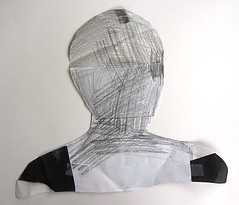
To transfer the image from the template to the wood I used a pencil and marked up the back of the template since I didn't have any carbon transfer paper. Placing the template onto the wood I outlined the basic features, hairline and shading. I didn't get a photo of this stage of my project, but here is the same stage for a similar hanger project.
With a color print out of the hand-tinted photo I went to work painting the hanger. I used acrylic paints, which dried a little too fast for my liking - but since I'm pregnant and working on the kitchen table it worked well enough. Her skin blending is a little more splotchy than I'd prefer. I did three sessions of painting and ended with a wash of transparent yellowish brown to give it a more aged look, rubbing some of it away so that it wasn't too thick. I painted the edges and the back black, letting some of it come over to the front of the hanger. If I wasn't pregnant I would have finished the painting with a thick varnish on the edges and back to give the clothes a more slippery surface for sliding onto.
Finding the hook-shaped hardware to turn it into a hanger was challenging. I looked online for sources, but there didn't seem to be any. Sundee's dad, who was also working on a similar project to hang a knitted shawl from, found a great solution. He looked at various wooden hangers until he found the type that the hook is just screwed in - just unscrew it and you have your hardware. Since you are sacrificing a perfectly good hanger, it's nice to find them cheap at a $1 Store or garage sale - I found mine in my closet. Using a drill bit that is slightly smaller than the diameter of the hook I, then, drilled a hole in the top of the hanger. Screw in the hook and you're done.
An alternative version, and a bit easier, would be to get a full-sized color print out and decoupage it to the wood - no painting! One of my next projects is going to be a children's hanger to display a vintage polka-dot bathing suit.


6 Comments:
Wow! I like it. Great how to also.
I am enjoying reading your blog.
Dear Green :-)
I know this comes a bit late, but perhaps you could use some of this later :-)
http://www.ladybluestocking.com/
http://www.erte.com/
http://flickr.com/photos/farfalla_design_studio/
http://flickr.com/groups/as_she_was/pool/
Hugs,
Ket
Oh, and I forgot - go to Deviant Art and search for "vintage stock"...
http://www.deviantart.com/
She looks great! Thanks for the instructions...I'm going to have to make some to use for vintage clothes at the shop!
GREAT idea!!!
: )
/ Jenny
<3
I adore this vintage look. What fun hangers for your favorite items. I will have to make some of these for myself and my friends. They will get a kick out of it.
Post a Comment
Links to this post:
Create a Link
<< Home